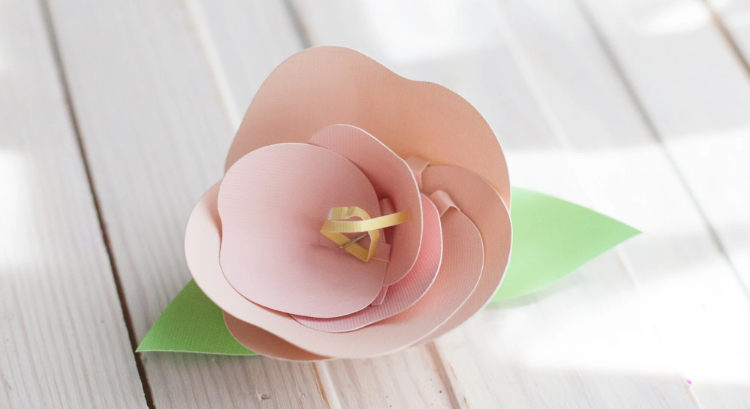
As a Cricut user, you likely know that this smart crafting machine makes many things possible. With this machine, you can bring your creative ideas into reality. Everyone loves flowers, but have you ever thought about making paper flowers? If not, prepare with your crafting companion to make personalized beautiful flowers.
If you think that it is a bit tricky, then do not worry. It is not tricky; you can easily do this with the help of this guide. Here, I will show you ‘how to make paper flowers with Cricut‘. So, let’s get started right away.
Essential Materials for Creating Paper Flowers
If you are looking for something creative and fun to do with the cutting machine, you can make this paper flower. To start making it, you need to gather all the materials and tools.
Paper flowers are a beautiful and versatile decoration for any occasion, whether a wedding, birthday or home décor. With this cutting machine, you can create stunning paper flowers with ease and precision.
- Cricut Maker or Explore Air 2
- Cardstock in pink and corals for petals and heart
- Cardstock in glitter gold
- LightGrip mat
- Hot glue
- Quilling tool
- Tweezers
How to Easily Make Paper Flowers With Cricut at Home
You have collected all the materials. Now, you will start by showing ‘how to make paper flowers with Cricut‘. The very first step is to create a design. Follow the steps in the section below:
Step 1: Create a Design

To make your paper flower, you first need to make a design.
- First, open Cricut Design Space and click on the Image option.
- Then, click on a category and all images in the top left corner to bring up the search page.
- From the left column, choose Image Sets.
- On the search bar, type flower, scroll down to choose an image of a flower, and click on it.
- When you are done choosing an image, resize it according to your project.
- You can also click on New Project, insert a circle, and turn it into an oval.
- After that, duplicate two more times and make it three ovals.
- Try rearranging the shapes so they overlap, and then click on the Weld option to turn them into petals.
Step 2: Cut the Glitter Paper

When you are done designing your petals, it is time to cut it. To start cutting with your machine, follow the below steps:
- After making your flower design, click on the Continue option.
- Then, a preview window will open on your screen where you can choose a mat.
- Under the Base Material, choose cardstock.
- Next, load the mat into the machine and hit the Load button.
- Your machine will detect the size of your mat, press the Go button, and let the machine do its thing.
Step 3: Unload Your Design

Follow the below process after cutting your design:
- Press the Unload button to remove the mat when your machine has finished cutting.
- Flip over the mat, and your design will easily pop out. It does not just slowly peel off.
- If you need to weed out extra parts from the flower, use the weeding tool.
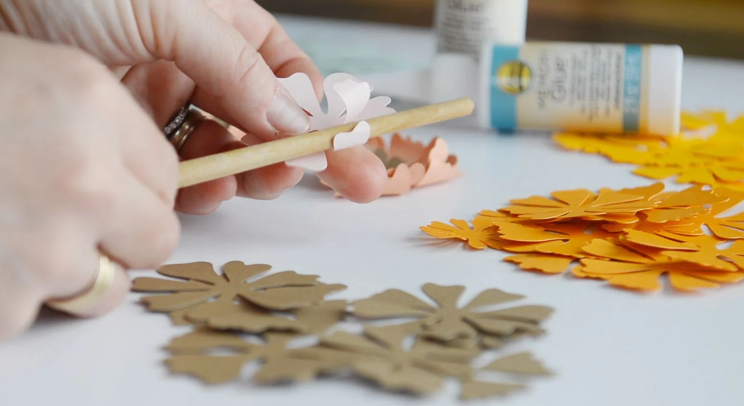
Step 4: Assemble Your Paper Flower
After you have cut your design, it is time to quill it and give it a look of a flower. Follow the below instructions to do so:
- First, slowly insert the end of the paper flower cut out into the slot of the quilling tool.
- Then, roll the quilling tool towards you while holding the paper steady.
- When you are near the end of the paper flower, it will become a little harder to roll, but hold it properly.
- When you are done rolling it, firmly hold the roller paper on your finger and gently pull out the quilling tool.
- You can position the paper flower as you like, bend back the circle, and use glue to roll the ends.
Step 5: Glue Your Paper Flower to a Stem
Finally, this is the last step in making paper flowers with your crafting machine. Follow the below instructions:
- If you want to create a bouquet or a flower arrangement, you will need to attach and glue your paper flower to a stem.
- Gather all your flowers and attach them with hot glue.
- Now, press the wire to the glue and make sure it is sticking properly to the flower.
- After attaching the wire to the flower, wrap the floral tape around it. This will give the flower a more natural appearance and make it look professionally arranged.
Summary
Making paper flowers with Cricut is an enjoyable and creative process that allows you to create beautiful floral designs quickly and easily. Whether you are creating paper flowers for a celebration or a special occasion, this machine makes it easy for you to cut flower designs with precision and ease.
If you have been wondering ‘how to make paper flowers with Cricut‘, this guide will help you. It includes all the tools and easy steps to get you started. Unleash your creativity with this machine.
Frequently Asked Questions (FAQs)
How to Restart Cricut Design Space on Computer?
To restart Cricut Design Space, you can try many methods, such as closing the task manager, force-reloading the software, closing and reopening the software, or restarting your computer.
Which Is the Best Material for Making Paper Flowers?
No single material is best for making paper flowers. It depends on which kind of flowers you want to make and the look you are going for. Usually, Cardstock is the best material for making flowers with Cricut. It is the best choice because it can be easily stretched, shaped, and textured to create petals with various flower designs. If you want to make a delicate flower, choose crepe paper that suits your design and look.
Can Cricut Cut Flowers in Different Shapes and Sizes?
Yes, Cricut can cut a wide variety of flower shapes and sizes. Whether you have to make a small flower for your card or you are making layered flowers for a bouquet. This smart cutting machine has different kinds of blades with adjustable cutting settings that allow you to personalize your project.
Why Is My Cricut Not Connecting?
If your crafting machine is not connecting, follow the steps listed below to get it working again.
- Check if your machine shows up in your device’s Bluetooth list.
- Try to unpair your machine from the Bluetooth settings and then re-pair it.
- Ensure your machine is within the range of your device (within 15 feet).
- Ensure you’re using the latest version of Cricut Design Space. Outdated software can cause connection problems.
- Confirm whether the device you’re using meets the minimum system requirements for Cricut Design Space.
- Check the USB cable for damage and replace it if needed.